No, no – not a fancy new pattern to make a scarf out of – an actual MISTAKE with the ribbing in my Central Park Hoodie. I should just start calling this sweater Mistake Park since I already messed up the swatches. Not a good sign when you’re starting out.
I was so happy to show you how I’d done all the ribbing on my hoodie – the one wear I put together the fronts and the back so I could do it all in one piece up to the armholes. I was so happy to be done with the ribbing because I hate ribbing – that back and forth and back and forth. I love to purl – but only when it’s in one long stretch. Hate the back and forth.
And I DID finish the ribbing – all 28 rows of it! (Because when you get a swatch to work and you need four inches of ribbing you know EXACTLY how many rows to knit – isn’t that cool?) I was all set to start my cable charts when I realized that I had done something very very wrong. Apparently, I can’t read a pattern. When I was trying to figure out how to put the whole thing together somehow I neglected to read consult the charts and ended up starting my fronts with knit stitches. As the lovely Margaux confirmed, I needed purl stitches. Yup. I’m an idiot. (And it makes total sense now because I couldn’t understand how the pattern wanted you to seam this baby up without giving you any stitches for seam allowance. Turns out it does. Duh.)
So I ripped the freaking thing and started all over. Which I hope is good news for you because I’m going to do a little tutorial about how I cast on for ribbing. Bear with me because I’m not the tutorial type – go see Eunny for that because she ROCKS the tutorial. Or Grumperina. Anybody but me. I get all frustrated and just want to grab the knitting out of your hand and do it myself. So much easier. But Ann asked about my ribbing cast on technique the other day and seemed excited when I said I might write this up and my entire goal in life these days is to excite My Ann.
Okay. This tutorial presupposes that you know how to do a long-tail cast on. Which I shouldn’t really suppose because for years I did a knitted cast on for everything and had no idea there were a million other ways to do it. Then I took a class with the knit god Shirley Paden called 101 Ways to Cast On (not really, it was more like fourteen) and she taught me this trick. If you don’t know the Long-Tail Cast On, there are like 4,561,923 sites out there to show you. Or you could look here (first cast on mentioned.)
When I cast on for ribbing (2×2, 1×1) or any stitch that alternates knit and purl, I use two variations on the long tail cast on to create a first row of knit purl stitches (or whatever combination I need for my pattern.) For the Central Park Hoodie, I’m using a 2×2 cast on. Those of you familiar with the long tail cast on will recognize this next picture:
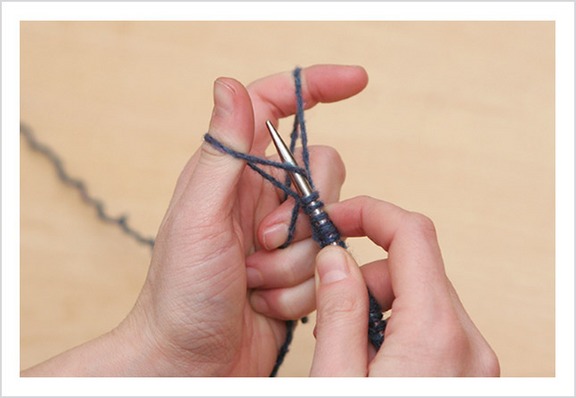
Click for bigger.
This is ostensibly the KNIT STITCH CAST ON. It’s also the regular long tail cast on which I use for pretty much everything unless the pattern specifies something else. Or I’m doing ribbing. What happens, though, when you turn the work around to start knitting, is that it can give you a PURL STITCH. This cast on has you sweep under the loop around your thumb first. Again, I refer you to the video in the link above.
Now, there’s another way to do this. It has you sweep under the loop around your FOREFINGER. See picture below:
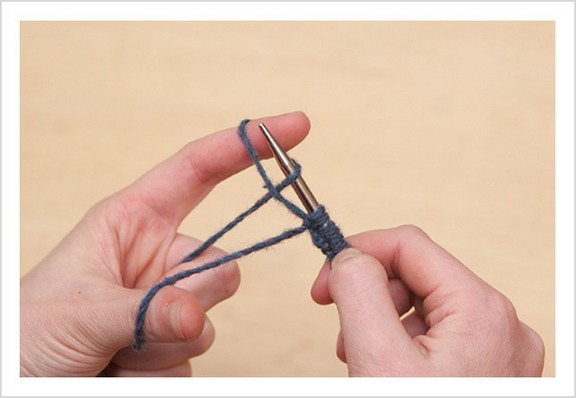
Click for bigger.
This is called a PURL CAST ON which will give you a KNIT STITCH. I don’t have pictures to show you how to do this and I tried to explain it to Ann last night, who did get it, I think (we were on the phone) and I couldn’t explain to you how to do it if I tried – but here are a few links that might help.
Here’s where things might get a bit confusing – although it might just be that I’m confusing – but I have a picture to illustrate.
Click for bigger.
When you use the regular long-tail cast on, it gives you a stitch that it is very similar to a knit stitch – so that when you start your knitting, and say, you are doing stockinette stitch, you’d want to begin with a PURL row. This means that your cast on can act as the first row. I, personally, hate having to keep track of things like that and I want to start my first row on the RIGHT SIDE, so when I’m doing ribbing, if the pattern calls for k2 p2, I will cast on PURL WISE PURLWISE KNIT WISE KNIT WISE so that when I turn my knitting around I can just start with my k2 p2 and it will look perfect. See that picture above? (Click on it and it will open in a new window so you can read and look at the same time.) These are stitches JUST CAST ON – they’ve never been knit. See how the PURL CAST ON/KNIT STITCHES look like they have a purl bump? They do! So when I start knitting on the other side they will be KNIT STITCHES! How cool is that?
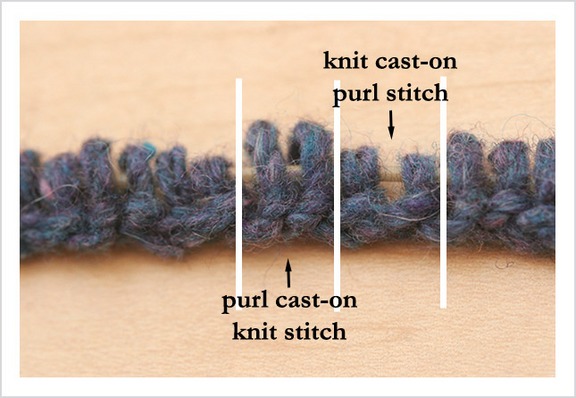
Here is a picture of ribbing from a sock I just finished:

Click for bigger.
In this picture, I tried to illustrate how the ribbing will look once it’s been knit for a bit – see how there knit stitches start out with a little bump but then flow into Vs? And see how the purl stitches ALWAYS look like purl stitches, from the second you cast on? Isn’t that nice? All neat and pretty?
I love to use this for seed stitch borders – the back and forth, knit and purl of the cast on adds a whole new row to the piece.
To reiterate, I cast on my sweater with a p2, k2 cast on so that when I started knitting I could do a k2, p2 rib. I hope this makes some sense to you. As I said, I’m not so good with the tutorials and stuff, but I thought I’d pass along my time tested technique. And a huge thank you to my darling husband who took the pictures of my hands – it must be really really really hard to take pictures for a photographer. I’m sorry I yelled at you. 😉
Maybe, bar any other mistakes, I’ll be able to show you finished ribbing on my CPH. Don’t hold your breath though!


funny you did this particular cast on…i was just looking at a sock pattern last night (embossed leaves) that mentioned this type of cast on and i was trying to wrap my brain around it. this really helps-thanks!
You really are vastly clever. I am impressed. Never even thought of alternating.
Doh.
Nancy Bush has the purl cast on in her Folk Socks book and I’ve used it from time to time. Nice, VERY nice tutorial. You rock!
That’s a lovely edge … how stretchy is it?
Great!!! I had bever heard about it before..! Very useful..thanks!
yep, as one of the previous commenters mentioned, the embossed leaves sock pattern has instructions for doing this with a 1×1 rib. i thought that the diagram at the back of interweave for that particular cast-on was pretty good.
This is an epiphany for me! I am a relatively new knitter……….and although I have a large library of knitting books, this cast on isn’t mentioned in any of them. I am on my 4th project, a very intricate (lots of pattern repeats)cabled baby blanket which I started and frogged 5 times before I got right and even then I had to start on the WS to make pattern. Had I known this cast on I would have been a lot less frustrated. Thank you so much, I almost understand how to do it, but I GET the concept. I so need a teacher…..you would think in NY I would find one.
Totally makes sense and I’m kicking myself now… I’m a lefty who learned to and primarilly knits backwards (not as confusing as you’d think really), so my long tail cast on always results in my cast on edge being backwards, never thought to flip the cast on this way let alone use it for ribbing. Brilliant! 🙂
This totally makes sense. (You are no longer allowed to say you don’t give good tutorial. OK, you are, First Amendment and all that, but we’re allowed to ignore you when you do.) I usually do a tubular cast-on, not the one with waste yarn which I totally don’t get, but the one where you start with the main yarn and a (shorter) long tail and do a different loopy thing, and if it’s 2×2 I flip the sts. I’ll have to try this one, though.
Hey no more tutorial self-consciousness allowed! Thanks so much and here I thought the only way to achieve a nice edge was through the ultra scary kitchener rib cast-on a la that ball-buster Katharina Buss. Your way doesn’t involve waste yarn, a HUGE advantage!
Haha, I am the same way – I want to grab people’s knitting and fix it for them! But I am trying to get better at explaining to them how to fix it. The latter is much better for both of us – the knitter gets to exercise the technique, and I get to pretend that I am becoming better at teaching…
I’ve been knitting for umpteen years and usually use the long-tail cast on but I never even knew you could do a purl version of it. Thanks, Cara. Very helpful post!
Ah! I never would have thought of doing a ribbing cast-on! Thanks for the tutorial – it’s certainly helpful!
very cool idea… not that my brain can really wrap around it 🙂 for now my one braincell is fighting with the concept of colourwork increases…
but really cant wait to see your Central Park Hoodie as after seeing Carrieoke’s I am thinking I wouldn’t mind one of them too! Not that enough smart resides here to do it 🙂
Ahhh…that’s brilliant! I’ve always just done a regular long tail cast-on, but doing it left to right instead of vice-versa…I feel like you’ve reinvented the wheel (a newer, better one). Brilliant!
I was so pleased when I learned the purl way to do the cable cast on. Now I will have to study your picture and links, and figure out how you do this one. Thanks.
Duh!!! I never thought of alternating. Thanks!!
oh my that would’ve been great to know for last project which was a fully ribbed baby sweater!
Gleek taught me that cast-on technique last year! Isn’t it awesome? Your tutorial pictures are very clear.
There’s always something new to learn — thanks for giving me a challenge for my next project (that has ribbing . . .)
Initially, this was making my brain hurt. I’m marking it to come back to when my head is less befuddled…
Hi! I *really* enjoy your website. I discovered it during the holidays when things were slow at work, so I got to read a bunch. Good times!
I have a non-post related question. I am knitting my first pair of socks (!!) and I’m wondering how it is that you knit socks in the round with your addis when the circumference of your sock is clearly so much smaller than the curcumference of your addis. Does my question make sense?
Many thanks,
Meg – meg@winestead.com
hmmm – I’ll have to play with that when I can sit in front of the screen and play with it while I read ALTHOUGH it makes perfect sense. Wonderful tutorial though – who knew? You have so, so SO many talents!!
Humm I am going to have to try this one. You did a fine job at the explanation. Thanks for the tutorial.
I’ve seen that technique in sock books but I’m always too lazy to do it! Go you!
Love the cast-on – I haven’t seen that one before – and I’ve been knitting for over 40 yrs… Very well done on the tutorial!
One question – instead of frogging your ribbing on the hoodie, couldn’t you have just worked one more row & used the other side? If it started with knit stitches on one side, the other side would start with purl stitches. (I don’t have the pattern, so don’t know if there’s more going on than meets the eye.)
great post! i was going to ask you how you did that when i got your email… very cool. ever thought of being a hand model, i hear they make good $$ ha!
Isn’t it funny how one person’s hell is another person’s heaven? I grew faint reading that you hate ribbing. I was like but..ribbing! It’s so wonderful! It’s the best! It’s a good thing there’s a bunch of different ways to do everything in our beloved hobby. I’m bookmarking this post, because of how much I love ribbing and how next time I’m going to cast on for it just like this.
Cara, thanks for this “tutorial”. I’ve always just used the cable cast on ~ it’s the first one I learned, and for years I didn’t even know there were other ways to do it! This looks interesting, and I’ll have to try it out.
In all the years I’ve been knitting, I’ve used the long-tail cast on for just about everything…and hated the way the *first* row created by the cast on sometime didn’t fit the pattern. NOW I know how to modify it so it does. Thanks, thanks, thanks! A+ on the tutorial!
I taught myself to do this from Charlene Schurch’s hat book. She has clear and easy instructions and illustrations. Then I forgot how. Then I didn’t think about it and my hands remembered. But they forgot again! I’m hoping your picture will remind me, or else it will be getting the book from the library again! The alternating K-P cast on makes the cast on edge disappear more nicely.
Very cool!
how cool… however I think I may have to read it again when I’m not so tired to completely “get it”
Awesome, thanks for that! I’m definately going to use it on my CPH and a vest I’m about to cast on for! 🙂
DAmn cool. It pleases the OCD part of me.
Cool. I hope when I grow up I’ll have the ability to work things like that out from scratch. I’ll just have to wait… for how long? I’m 49 already. sniffle.
I love the image display in your blog header.
Thanks Cara, for a great tutorial.
Love the photo you have as the header for today. What is that – a Russian thorn covered in frost? Particularly vicious roses? It’s magnificent.
I have received my patterns for the chemo cap. Am going to attempt one. If it ends up looking more like one of my teddy bears though….. It sounds like there’s been a tremendous response.
You are a clever girl!
And what is it that happens to a brain to make it ignore instructions? I was knitting a slouchy hat and did not make the increase. Didn’t realize it until it was time to decrease. There was much swearing. You’d think that by now I would know how to read.
Cool idea. But I’m still a little confused. Since CPH is a cardigan I’m assuming you are doing back and forth knitting (i.e. not circular). So if you start the CO with P2 K2 are you ending the CO with a P2 K2 CO sequence? If so, when you turn your work and start working Row 1 don’t you need to P2 K2 in order to keep the sequence of knitting and purling the same? Or are you ending the CO with a K2 P2 CO?
Hmm… for this sweater, I actually did a tubular cast-on and then just switches the stitches every other pair. It made a great edge actually… unfortunately, I don’t think there is a way to do a matching tubular cast off for the ribbing around the front and the hood. Of course, I likely won’t be at that point for quite awhile judging on the speed at which I’ve been completing this particular project. 🙂 (That’s what I get for knitting something for myself that doesn’t have a “due date”)
You know how to tell when your special? WHEN YOU GET SOCKS THAT ROCK NAMED AFTER YOU!!!!! 🙂
Brilliant, thanks! Now I’m even looking forward to my next ribbing and I hate ribbing. I always look at is prelude to the real knitting for some reason. Maybe it will let look at ribbed cardi-type patterns in a whole new way. You’ve changed my outlook, at least for today…
Thank you! I am just a beginner at knitting (converting from many, many years of crochet), but an adventurous one, and I wondered about this but had yet to figure it out. It seems to me some things just go unsaid when it comes to patterns and instructions. My next pair of socks will appreciate it!
thanks so much for posting this! I was looking for a 2×2 cast on over the weekend and didn’t have any luck finding one.
Who rocks the tutorial? Dude. It’s you. Thank you!
I took the liberty of tagging you for a meme that I heisted from Rebekah, though I think anyone who wants to should hop on and do it, too.
I really do like your blog so, it’s quite wonderful, and I fixed the wording of mine- sorry about that. The more tired I get the more stream of consciousness I get. Thank you for your comment! It was very sweet. And I will definately be coming back here for my next ribbing cast on.
Yaaaahhh, more cast on goodness!
Very nice tutorial indeed. WOW.
And my condolences for the non-reading of a crucial instruction. Happens to me pretty often– keeps me humble, but sometimes humorless.
Brilliant! That makes so much sense. I need to go cast on something to try this out.
Goddess. That is exactly the first thing that popped into my head after I read your post. You are a goddess. You should *see* all the little light bulbs lighting up over my head. THANKS for the great tutorial.
As a knitter who learned the continental cast on at age 10 and proceeded to believe it was the only cast on for another 10 years or so, I’m in awe. I never even thought of doing it alternatingly. Shows how inventive I am, huh?
Seriously, a wonderful tutorial!
So wonderful that I actually delurked for it. 🙂
OMG……I frogged this sweater numberous times also…..I CAN”T READ…..not really, but I kept reading ahead…part of the problem…I would love to knit this in the round……but I think my head my blow up….
I always use long-tail cast on, and like the edge with what I have been doing for years…for socks…I always knit the 1st row before starting my rib and it gives a nice clean look to the tops of my socks…
Look at it this way, now you’ll be a Master Ribber 😉
I thought your tutorial was very clear and the pictures were informative. You did good. I’ll have to try this next time I cast on a pair of socks.
Very cool! Thanks!
Brilliant! I just cast on for a hat for my son (the child who refuses to wear anything warm, much less a hat…), and this was the perfect tutorial.
I know this post is kinda old by now but I am catching up…
Thanks for posting this- I never even knew that this was possible! Have you ever seen the same thing for a bind-off? I am gonna try to look for one… (I am mainly a toe-up sock knitter.)