*** This is a VERY picture heavy post. Hopefully it’s worth it! ***
Yesterday my partner in crime had to work (and when I say work I mean spend all day in a yarn shop knitting. And occasionally selling some yarn.) I was telling her about my blog post, the one where I swore up and down in Latin, and the cell phone connection was sketchy at best. She kept asking me “Who are Janice and Marge?” And I’m all, “I don’t know. Who are Janice and Marge?” It was like that old(ish) cell phone commercial where the wife asks the husband to take a shower and comes home to find the kids covered in flour. You know which one I mean? I’m trying to freaking curse in Latin, telling her about Janus and Mars and she’s asking about two ladies of a certain age who play Mah Jong twice a week. If you must know, Ann insists on being Janice, which I guess leaves me Marge. (Sometimes we talk about taking our show on the road – you know – like having our own podcast, because honestly we’re so fucking funny together. But usually we come to our senses and realize that while in our own minds we’re the next Lucy and Ethel, really we’re more like Wilma and Betty. Just not that funny to anyone else.)
I’m in that whole Never Say Never Again mode because I’m about to rock your world with a tutorial that amazes even me – and I’ve done it (PERFECTLY) twice already. I’ll be trying one more time before I move onto the REAL DEAL. This shit’s like ALCHEMY. Okay – first the props: Thanks to my Janice – always telling me what an ass I am. Stephanie – for letting me know I had options; Margene, who first told me to CUT IT, JUST CUT IT! Then to Jenn, who reminded me that she fixed a cable in the issue of Yarnival I edited. Jenn led me to Vicki in Michigan who actually did CUT IT, JUST CUT IT! Then Margene told me to email Terry, who she thought had also CUT IT, JUST CUT IT! Terry told me to look in the Harmony Guides Knitting Techniques, Volume 1, p. 67 – which I happened to have on my shelf and which told me EXACTLY what to do – even using my cable as the example. Terry also pointed me here – another person who CUT IT, JUST CUT IT! And, of course, to all of you, who definitely have my back. THANK YOU!
Okay. Take a deep breath and prepare to be amazed. Not just from the results, but at how fucking EASY this is. (Click on any and all pictures for a bigger view.)
STEP ONE:
Prepare your instruments. I told G what I did when he got home last night and he told me I was like a surgeon. And it’s true – so sterilize your tapestry needle before performing any cutting.
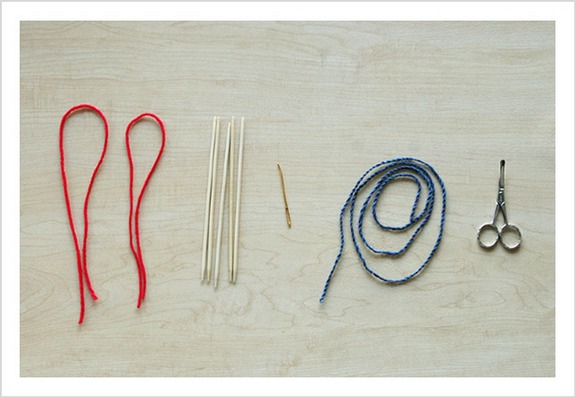
From left to right we’ve got: two lifelines (any extra yarn you’ve got lying around – preferably a bit smaller so you can get it in and out easy); double pointed needles (yesterday I went to the craft store to pick up some dpns because I have like 2 sets in all of my needles. I bought 9s, 8s and 5s – I’m using 9s for my project, but thought maybe I should use something smaller. I ended up going with the 5s and it was fine); tapestry needle; project yarn for grafting; SCISSORS. Yes, we’re going to CUT IT, JUST CUT IT!
STEP TWO:
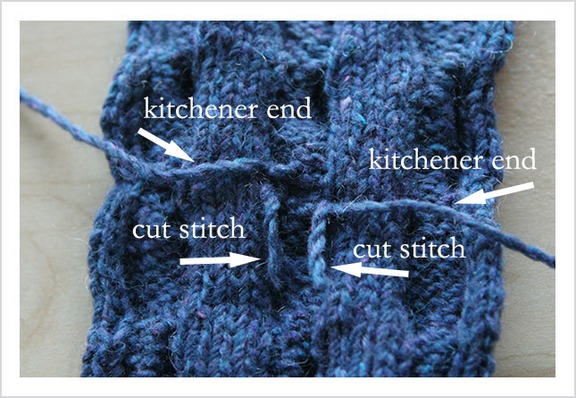
Okay. The first step is to isolate the stitches that need to be fixed. But first, let’s show a picture of what the swatch looked like before the fix:
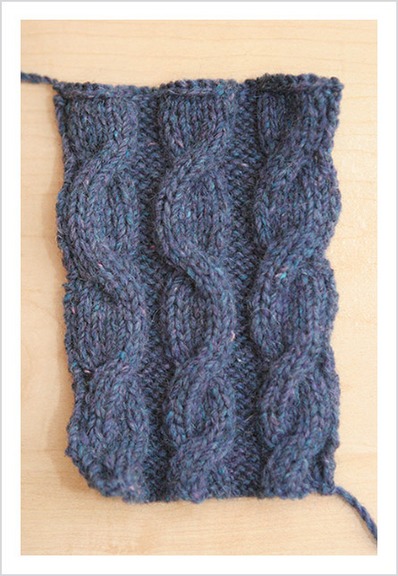
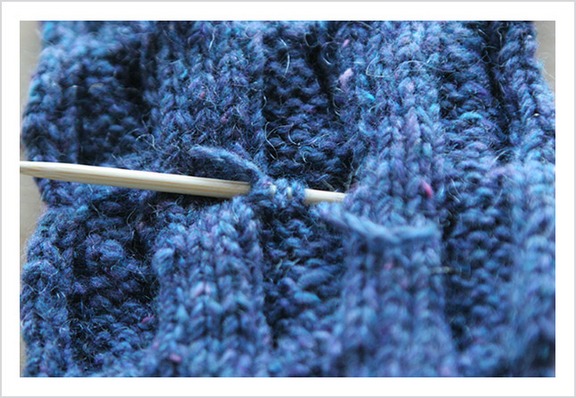
Nothing up my sleeves. 😉 We’re going to be working on the middle cable today. This cable is a 6 stitch cable – I’ve pulled the first three stitches to the FRONT (for a left leaning twist) when I should’ve pulled them to the BACK (for a right leaning twist.) The thing about cables is that the stitches are almost suspended in the air where they twist. You could conceivably slip your finger through the hole that appears once the twist has been made. For instance:

I’ve slipped the dpn through the hole so that I can isolate the middle row on top of the cable. It’s the only row that isn’t really attached to any other knitting. There are three stitches there. I’m going to cut the MIDDLE stitch.

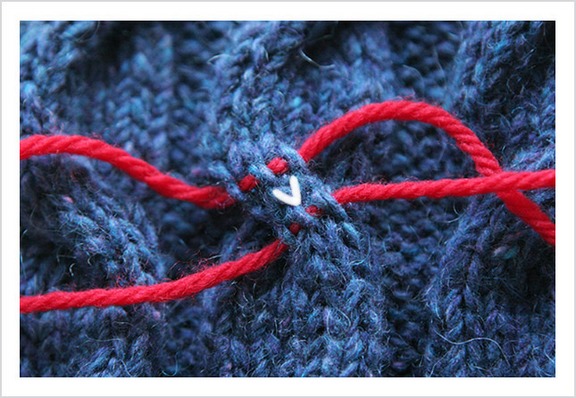
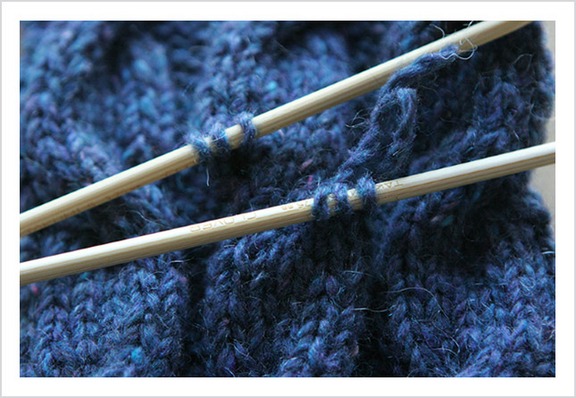
STEP THREE:
Now that I know which stitch I need to cut, I want to anchor the rows above and below the middle row – these are going to be the stitches I graft together, so I want to make sure they’re safe. I do this by threading a life line through both rows.

I used a yarn that was smoother and thinner than the yarn I’m using for my project – it’s also a contrasting color. Things you might want to consider when choosing your scrap yarn. I also like to use a lot of yarn in these instances – this minimizes the chance that the lifeline will slip out. Great! Now comes the FUN PART!
STEP FOUR:
CUT IT! JUST CUT IT! Yes, my friends, we’re going to cut the stitch. Which, I’ve got to admit, wasn’t that hard and was strangely exciting. Like you’re doing something really really really wrong but it feels kind of good at the same time. TABOO. Alright. Calm down Janice. Before we cut the yarn, we want to double and triple and quadruple check that we’ve got the right stitch to cut. WE’RE ONLY CUTTING ONE STITCH! It’s the MIDDLE one. Okay? THE MIDDLE ONE.
Good! We’ve identified the middle one. Identified it again. And again. And then lit a candle to Athena. Now we can cut.
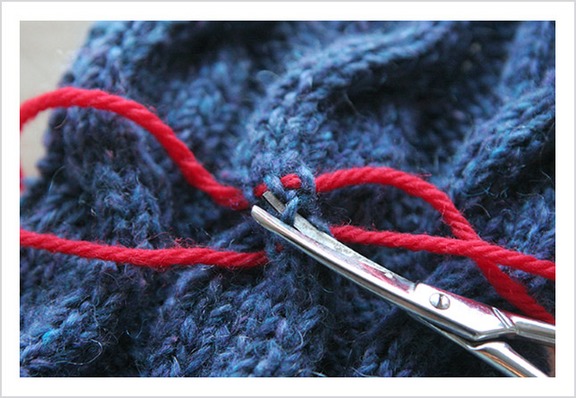
SNIP!
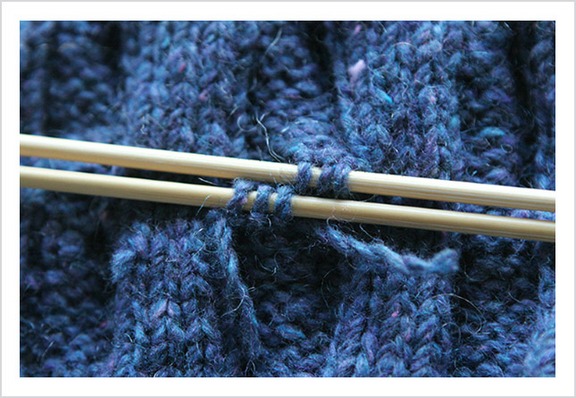
STEP FIVE:
Breathe. Breathe. It’s only yarn. We can reknit it. We can make it better than it was before. Knit it stronger. Now you’ll need your DPNs. You can pull the cut stitch a little bit, but I prefer to put the newly live stitches on the dpns before I really separate the cut yarn.
Once the stitches are on the dpns, you can take your tapestry needle and unravel the cut yarn. It’s all going to open up so nicely. And what you’re going to see below the stitches you just unraveled are the stitches that were twisted BEHIND the cable stitches on the top. They look all nice and neat and completely untouched. Just the way we want them to be.
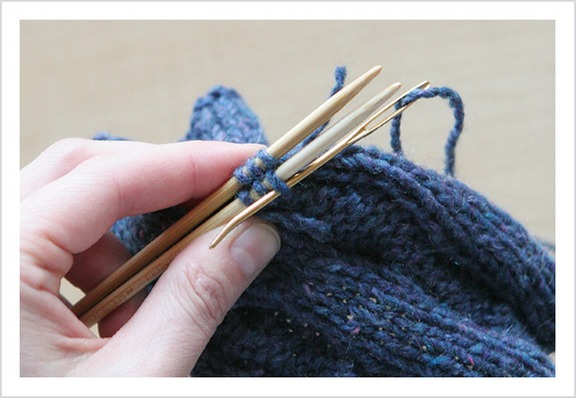
STEP SIX:
Here’s where we re-twist the cable. What we’re going to do is SLIP the DPN with the stitches on it BEHIND the untouched stitches.

This part is a little bit fiddly because you need to get the DPN completely behind the stitches that will now be on TOP of the cable twist. When you’ve gotten one DPN all the way through – so that you now have all three stitches UNDER the new cable twist and at the BACK of the swatch (project) – maneuver the second DPN the same way. Now you’ve got the six live stitches in the BACK.
STEP SEVEN:
Now we need to somehow attach those live stitches together. I’m going to say the word that people seem to hate: KITCHENER. I actually LOVE to kitchener stitch. Think it’s so freaking cool (again with the knitting alchemy) and have it completely memorized. So I kitchenered the live stitches together using a fairly long strand of project yarn.
(Thanks G for the picture!) All I did here was kitchener the six stitches together leaving a pretty long string hanging down. Basically we’re putting back the row of stitches we cut out. Here’s what the back looks like after kitchenering.

Not bad huh. If you need to learn how to kitchener, there are about a million internet sites to teach you. Here’s one I like. Okay, moving on.
STEP EIGHT:
Now you’ve got four strands hanging out in the back of your work:
All that’s left to do is weave in those ends. Chances are your cable butts up against at least a couple of purl stitches on the front – which leaves you knit stitches on the back which are SO easy to weave into. For the shorter strands – the ones from the cut stitch – I like to weave the tapestry needle through the stitches first, then thread in the short yarn and pull it through. I really didn’t have any problems weaving everything in. See?
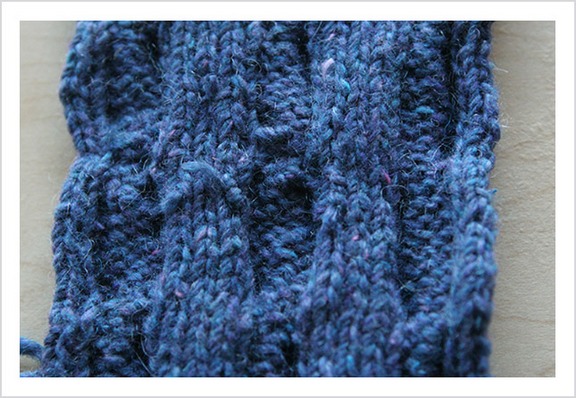
And here’s how it looks when you flip it over.
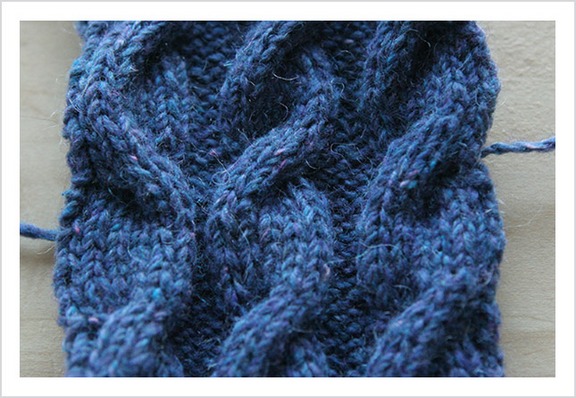
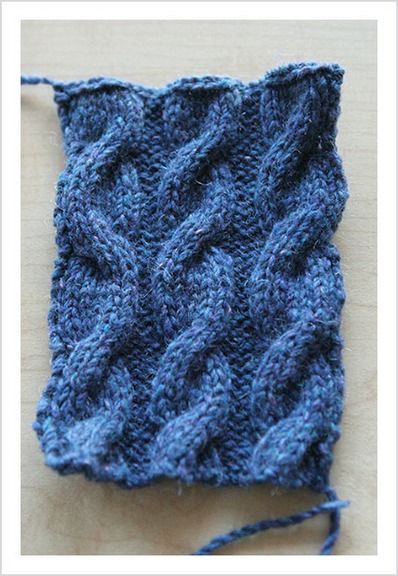
And here’s how the swatch looks:
And here’s how I look knowing I can fix my sweater and have it look absolutely perfect without having to rip back pretty much the whole thing:

Still scary but much, much happier! Can you believe how easy this is and how fucking fantastic it looks? I’ve done it exactly twice now and both times it’s been so easy and comes out PERFECT. I will be trying it on the one last cable on the swatch – because it’s in the same position as the cable on my sweater, but I’m pretty confident it won’t be that big of a deal to cut the stitch on my sweater. I HIGHLY recommend making a swatch and practicing first before you attempt this on an actual project. I hope this tutorial helps you. When I called Janice last night to tell her that I had FUCKING DONE IT AND IT’S PERFECT, she said now aren’t you glad you made that mistake? Don’t you feel all empowered? And yes, I felt incredibly powerful. Which is kind of odd because all I did was snip a little stitch on something that I could easily have knit over again. But I guess it’s that I took control and FIXED it. I BOSSED MY KNITTING AROUND. Here’s to the power of knitting. And to an amazing community of knitters. Thank you!
PS – There’s an excellent chance that someone who comments on this post will hit a BIG number for me. That person will win a prize. It might be this post, it might not be, but it’s coming. Have fun!
PPS – THE NUMBER’S BEEN HIT! Loribird left the 18000th comment on the blog! I’ve been waiting for this for a while now – and it’s totally appropriate that it came today because 18=LIFE and I just breathed new life into my knitting. Thanks for reading everyone! I really appreciate it!


Most excellent tutorial! All I need now is better reading glasses. Or a pair of those magnifying glasses things that surgeons use for delicate work. Oh and steadier hands. 😉
That’s amazing and I’m thrilled that you will not have to rip back on your sweater! Thanks for sharing your new knowledge with us…
Holy crap, that’s effin’ cool!
Congratulations!!
Wow, oh wow, oh wow!! you are the BOSS!!!
That is great and thanks for the great tutorial!
yippeee you are going to fix your sweater, can’t wait for that post…you go girl!
Congratulations! You give me hope for my own cabled projects when I discover a cable going the wrong way around!
And because of you, I just purchased 3 skeins of STR that I am going to make into socks for ME ME ME! They arrived yesterday. My STR cherry is going to popped very, very soon. I’m giddy! 🙂
Congratulations!! I’m so glad and relieved for you!
This is fantastic, thank you!
You are amazing! I love learning new techniques for fixing errors in knitting, because I really hate to rip out. Your photos really help and are excellent as usual. Congrats!
I think I love you.
great tutorial! I am so happy that you won’t have to rip back the sweater! and now I have somewhere else to come the next time I mis-cross a cable many miles before I notice!
[take that mis-cross-cable-demons! 😉 ]
That’s freakin awesome. It’s like magic and I really like magic! 🙂
OMG…. You just tossed me back in the ring.
I read your post yesterday and said SEE! SEE! knitting sweaters is DANGEROUS! You can’t do it. Forget about it and go back to your little sock projects and stay safe you amateur…… even if you do have THIS waiting for you….
http://www.deardiary.net/show/diaries/65561/1168387200
But then you went and BOSSED YOUR KNITTING AROUND and I have to once again face the possibility of knitting a sweater of my own one day.
So now I have to step closer to the abyss.
And I was feeling so much more comfortable back in the safety of Sockville.
Sigh.
Thanks a lot.
😉
I’m so glad that you fixed it and I was able to help you fix it!
Next time (and let’s face it, there’s going to be a next time), instead of dropping the stitches and picking them all back up, I’ll suck it up and cut! Um, maybe…
Rock on! 🙂 This is easily the coolest knit-fix I have ever seen.
Good work on figuring this out! I would have just ripped it out, because I’m a scaredy cat.
Hi “Marge” – fortunately, mis-crossing cables isn’t a mistake I’ve made yet, although I’m sure my time will come. Thankfully, I now have your lovley pictoral tutorial in my arsenal of fix-its. Thanks for sharing!
You’re my hero. You, and everyone who encouraged you to try this. thanks for all the pics — I’m definitely a visual learner, so this is mighty helpful.
I love kitchener stitching too. I don’t get what the big deal is. It was one of those things that when I came across it in a pattern I almost dissolved into panic and then when I did it I was like “this is awesome?! What’s to be scared of?”
Wow. I may need some coffee after that 🙂 That’s really impressive – I’ve never been brave enough to cut and repair – very amazing! Great step-by-step pictures too.
Congratulations!!! And thank you so so much for sharing your tutorial – it ROCKS!!! Way to be the boss!
That is so friggen cool. And you didn’t even need vodka. Good luck on the actual sweater!
Very scary but I’m totally impressed. That is freakin amazing. I totally like the swatch idea and will have to file this away in my things to remember.
Very Damn Freakin’ Cool. And fabulous tutorial. Thanks!
Glad for the CPH.. but mostly- glad for you! You needed somt=ething to go RIGHT!
Great post and pic- bookmarking for future reference- 😉
That is freaking amazing! I’ve never seen anyone do that before–thank you!
Wow. That was a great tutorial!
I remember being amazed by Vicki’s tutorial, and now, amnesia is such fun, I am amazed again! I will definitely have a need for this at some point (anxiously pulls out cabled scarf and checks it — nope, not yet, but it’s coming).
That was very cool. I hope I never need to use this tutorial, but if I do, I’ll be really glad it’s here.
Score! I’m knitting a CPH myself, and I’ve used your experience as a cautionary tale. 🙂
On the one hand, I hope that I never have to use your lovely tutorial. But…if I ever do, I really appreciate the clear pictures and instructions. Thanks Cara!
Bravo, Bravo (but I think I liked the roman cursing post better 🙂
you make that knitting your biatch! i’m so happy for you, cara! what a fortune in disguise, you got to learn all new cool techniques and gain some bonus Knitting Points! Hail Athena!
I am SO bookmarking this post!
Because I know that I’ll need it, sooner or later.
Thanks for a great tutorial!
I’m so glad you were able to figure out a solution! And thanks for the tutorial.
Congratulations!
I meant to comment the other day to your Rome cursing (we’ve been watching it too thanks to blockbuster’s online movie thing) but I have to say Brava! to your amazing bossing of knitting. It looks wonderful and I held my breathe through most of it. whip your knitting into shape!
You (and Bruce) are THE BOSS!
Fan-freaking-tastic! I am one of those knitters who knits while doing something else (watching TV, talking to someone, eating, all of the above) so I’m bound to mis-cross a cable one of these days. I am so going to bookmark this great tutorial!
Way to show your knitting who’s boss!
Not only did you conquer your knitting – but you managed to make an awesome tutorial to save the rest of us from the agony of having to frog. As always – great photos to go along with it. Well done!
That is amazing! Definitely one to keep handy when this happens to the rest of us, which it surely will do.
Wow how cool!
Sweet fancy Jupiter, that was brilliant! I am in awe of your knitty balls. I was so rooting for you to pull the six stitches down to the mis-crossed cable and reknit up (a la Stephanie) but girl, you were right to cut. So right. Bravo! 🙂
That is like knitting VooDoo! Totally cool.
Too effing cool! I bow down to you!
All hail the magic!
Isn’t it funny how the things that make us feel stupidest end up making us feel so smart?
That is very freaking cool. That’s all I have to say, I’m otherwise speechless.
Marge, that was fucking brilliant.
You have courage, woman. And thank you for the tutorial!
wow, i am impressed. you can’t even tell where the mistake was!
*fans self*
i swear to janus, i was on pins and needles just reading this! 😀 you are amazing, that is all.
;D
freaking amazing. I got butterflies in my stomach reading it! I’m definitely bookmarking this post for my inevitable future cable screwups.
Holy Surgery, Batman! You’re a magician. Excellent tutorial. I’d never feel confident enough to do it, but it was grand watching you.
You’re so brave… and those cut ends are sooooooo short.
Excellent tutorial. Totally intuitive, too. Well done!
(Thinking of Janice and Marge: I called a friend, Karen, yesterday, and said “Hi, it’s Erin,” and she abruptly replied, “Yes!” to which I asked, “You knew it was me?” (I was calling from work) and finally I realized she’d misheard me saying I was Erin and thought I was asking for Karen. This is not the first time we’ve gone through these machinations.)
I needed a drink just watching you! It was scary but really cool.
Whew! I am so glad that it worked for you. What a great way to fix them rouge cables.
Thanks for the tutorial. I will have to bookmark this one in my knitting help so that I will have it when it happens to me.
That is a great tutorial, and I’m thrilled that it’s worked for you. I have to confess, my superstitious nature, coupled with the number of times the knitting goddess has laid the smackdown on me, makes me nauseated with fear that you are so elated before you’ve done the stitch on the actual sweater. Please hurry, the stress is killing me. 😉
Amazing! Get going and do the “real” one!
thanks for the tutorial. i have to admit that i would have frogged the whole thing.
now stop procrastinating and fix the sweater.
Very nice demonstration — I’ll have to remember that for the future. Good luck with getting the exact same results for your sweater!
You are the mistress of your domain!
holy crap – that is SOOOOOO cool! I probably would have tried to drop down the cable and reknit. Then it would have looked like crap and I would have ended up ripping the whole thing out and stuffing it in a bag in the back of my closet. Now – if I can only remember this the next time I miscross a cable…..
I felt a little guilty laughing at your crisis yesterday (and only because it’s happened to me before – trust me). Now that you’ve gotten it fixed – HORRAY!
That was, in a word, AWESOME!!!
I will definately remember that when my cables go wrong – thanks so much for the tutorial 🙂
That is super spiffy, and much easier than dropping down & reknitting!
(I was going to comment anyway; you didn’t need the prize to get me to delurk. Hee hee.)
That is absolutely amazing and I never would have had the nerve to try it… I may try a swatch just to prove to myself it really works! Thanks for the tutelage!
Yipee! That. IS. AWESOME! you have NO idea how perfectly timed this post is… I’m knitting my 1st pair of cabled socks, and I’m attempting FAR more cables than I’m able. Thus, I’ve been ripping and ripping ;( Thank you!!!
great job cara!! it does look absolutely perfect and you learned something new. that’s why i love knitting 🙂
This is a great tutorial and I’m impressed with your bravery! I am about to embark on an ambitious cable sweater from the new Melissa Leapman book, and yourexperience this gives me courage to go forward!
That’s awesome! I totally would have ripped it out. Last night I decided I needed another buttonhole, so I CUT IT, JUST CUT IT! And though it felt wrong to do it, I was stronger than I thought! Empowered even.
How exactly should one pay homage to a roman goddess? An alter of rare foods? Blood of a goat? Jewelry? You truly are a knitting goddess and I bow down before you.
Thanks so much for sharing the details. Something tells me I’ll need it someday.
Wow, that is absolutely amazing! I’m gonna have to remember this for when I finally get to my own CPH . . . ‘cos I KNOW I’m going to mess up at least one of the cable crosses.
Thank you!
Holy cow! That’s one of those crazy times when knitting and magic become hard to define from one another!
Thank you so much for the tutorial – it, along with this technique, is like a big gift to knitters everywhere!
YEAH, BABY!!! Take charge of that knitting!
Cara, I am so happy for you that I am dancing around my kitchen. (Well that, and my kids and I got a snow day today! LOL)
Now that is wonderful. The big problem is how to remember to do it, or even find this particular post, when I probably will need it!
You ROCK!! I’m so happy for you and what a great run down of something so amazingly simple. Don’t you just love it when you figure out a technique….and thanks for the link on the Kitchener Stitch…I love learning something new.
That is very cool, thanks Cara.
I swear I’m going to bookmark this post, I’m so certain it will come in handy someday… Knowing that, I should probably be more careful whilst cabling… Great job, and I’m so happy you can save the sweater!
Nicely done! Phew- Now doesn’t that feel better???
Too cool. Excellent tuorial. Am now regretting the messed up viking cabled sweater back I ripped out. Sort of.
I’m a relative newcomer to your blog, but I have to comment on this post: it’s just wonderful! Brilliant information, and I’ve just come this close to a really deep sinus cleanse due to trying not to laugh out loud whilst drinking coffee at work.
Woo!!! Hoooooo!!!! You go on with your bad ole’ self! I am SOOOOOO impressed! Now maybeI’ll have the courage to try to fix the mis-crossed cable on my husband’s socks that are like 10 sts to the inch! They’re beautiful socks, and he’s never noticed, but …. top down socks with a mis-cross at the top of the cable near the ribbing. Forgeddaboudit! Congrats woman, you are a brave soul!
I knew about this trick, but your tutorial makes it look very do-able. Great job, Cara! You’re really going to love that sweater.
You are a brave woman. Scratch that. You are a brave human. Period. I had to drink just to read that post. May Minerva be merciful and I will never have to refer back to this tutorial!!
Oh. My. God.
I agree with Wannietta – I really wanted a cocktail as I scrolled through the pictures. But THANK YOU for posting such fantastic detail shots of the process. I *almost* want to mess up a cable to try it.
i like the idea of “bossing your knitting around”. i’m going to have to try that. and also “putting my knitting in it’s place” or “giving my knitting the smackdown”. good job!
Amazing tutorial. I’ll need to bookmark this for when I inevitably make a similar mistake!
As a fairly new knitter (ok, I learned about a billion years ago when I was a kid, but I lived in Southern California so, why? now I live in the Pacific Northwest so, yeah!) of about a year, I was scared of a LOT of things. Kitchener, you betcha. But, thanks to you and Stephanie (YH) and lots of others who are so generous as to share, I’m afraid of nothing! (ok, I still can’t strike up a conversation with someone I don’t know, but I can kitchener the hell out of anything.)
Thanks for the great tutorial. The pictures help a lot. Hopefully I’ll never need to use this new knowledge.
Good job. I was waiting with bated breath to find out what you would do. I lurve it when you swear BTW.
I’ve been cheering for you! It looks like you showed your knitting who the boss is. Awesome results. When I showed my husband your post from the weekend, and asked him to identify the problem, he said “Oh. It’s twisted the wrong way.” Then I showed him where it was in the sweater. “Oh…(reverent silence).” I will happily show him the fix technique later today.
Happy knitting!
Awesome tutorial! Thanks!
Congrats – for being the boss of your knitting, and Thank You – for a fabulous tutorial. I must say, my heart was pounding as I read through the post.
That is so amazing! I LOVE bossing my knitting around, but I have never been so brave/crazy as to cut it yet. I’ll have to remember this next time I have a mistake soooooo far down in cables. Sweet.
It’s amazing what things people come up with to fix mistakes! Totally amazing. Glad it’s working out so well for you and thanks for the tutorial! I’m sure I’ll need it some day.
dude. you *totally* rocked that. I can’t wait to see it on the sweater!!
Your knitting must respect your authoritay! Congrats on bossing it around so sucessfully 🙂
WOOOOOHOOOOO!
That’s all that need be said really. Oh yeah, and you are brilliant. Now when I make this mistake (and I will make this mistake) I will Know What To Do.
I have no idea waht that number is but good job! I cannot wait to see it on your fabulous sweater.
Just like magic! Except you showed us how to do it;) Cool!
Cudos to you! 😀 I held my breath after you cut that stitch, it’s so scary. I have yet to cut my knitting (and still get a finished project). 😀
*de-lurks* Wow, that’s a wonderful tutorial! Congratulations on finding that trick! I’m really happy that you won’t have to rip back all of that wonderful sweater. Nice going.
That has got to be the coolest thing I have ever seen. Thanks for posting the step-by-step . Now, I have a cable of my own to fix!
You can now say to this sweater “You’re not the boss of ME!”
You’re a brave and competent knitter –
knit on!
I still hope I never need to do this but I’ll know where to look if I do. Thanks, Cara.
Coming out of lurkdom to say…that is quite possibly the coolest fix ever. I’ve knit a lot of cable sweaters – and have made similar mistakes and I’ve ripped (I so felt your pain yesterday)…I just couldn’t bare having that kind of a mistake in a piece of work. This makes it oh so much easier amd dare I say, a bit fun?? You’ve empowered a lot of knitters with this!! Thanks! 🙂
THAT, lady, is some true knitting voodoo. Thanks for the awesome tutorial!
Crazy shite! I’m glad you got it!
I had NO DOUBT you could do it. You showed us and your knitting who is boss. Never fear your knitting…nothing is a disaster unless the dog eats it all or the house burns down;-)
I’m sooo glad I was sitting down when I read that. Awesome tutorial. I’m a visual learner and this may come is handy one day! Thanks, Cara.
Bravo! (and a most excellent photo tutorial)!
I like your happy face much better than yesterday’s poor drawing!
You are really just too, too good. A cardiologist I used to staff a committee for liked to say, “technology has become so advanced that it often appears to be magic” and that’s just how I feel about what you’ve done – NOT just the doing but the explanation, because really, I’ve never looked at the technical aspect of how a cable works – it’s so simple really!! My TOTAL cabling experience was a pair of Fetching fingerless mitts for a friend for Christmas and I was so amazed at what I’d done – showed it off to my husband – and he was amazed. Your tutorial does such a GRAND job of showing just how that cable works AND therefore how simple it was to fix – ah still got my mouth hangin’ open. I’m gonna’ start another pair tonight and I’m gonna’ be brave and try it without that extra dpn. When is your book gonna’ be out ’cause you know sooner or later you’re gonna’ have to write one AND do your own pics. I mean, it’s just gotta happen!!
That is freaking amazing! I’m going to have to print this out and put it in a file to keep. I’m in total awe of you right now.
Totally cool… now maybe I will have the guts to try cables!
I can’t resist… when I’m told a commenter may be the lucky number, I *must* comment!
Heres a hand up for you two going on the road 🙂
And I must add, your tirade in Latin yesterday made me suddenly BURST into laughter. So loudly that I made Richard jump out of his chair across the room!
Great job, and excellent picture tutorial. Heres to hoping I never need to use it!
I’m speechless 🙂
Nicely done, Cara, and you’ve put together a really nice tutorial as well. I don’t think I’m going to *try* to make a mistake so that I can do this kind of fix, but it’s good to know it’s hear and that it almost seems easy. You don’t want to take on steeks for your next tutorial, do you?
WOW. That is voodoo. I had to bookmark this in case I need it sometime. Which may be very soon as I am working on a cabled sweater which I may have screwed up. Congrats on bossing your knitting around!
*
You are so funny and ..
That was Wonderful !
Such a doll you are for sharing this so thoroughly.
Congrats !
*
badass, my friend.
Janice and Marge? I prefer to think of you as Murdoch and Hannibal.
I have an extremely cable-intensive sweater I made after having hip surgery this summer while I was on pain medication. I have three cables going the wrong way and was just soooo discouraged. You have made my day by showing me this. I’m actually going to pull it out this weekend of the bag its been languishing in and fix it and sew it up! Maybe next week I’ll actually wear it! Thanks, Marge! 🙂
Awesome. Truly awesome.
Firstly, that’s the most amazing thing I’ve ever seen. I haven’t ever done anything with cables. I don’t like to knit them (everything is too tight…and it looks horrible when I’m done).
However, looking at your tutorial…is there a reason to put the stitches onto the DPNs BEFORE taking the live stitches to the back? Wouldn’t it be less fiddly to bring the scrap yarn through, then put the stitches on?
I think you just reached a new level of goddessdom for me! This just confirms why you are the first stop on my blog reading list 🙂
Congratulations, both for the fixing and the great tutorial!
And thank you for creating the class and tutelage categories in your archives: now I know I’ll be able to find this post whenever I need it. By the way, I don’t know if anyone ever told you so, but I have to say I absolutely love the way you organized your archives! It’s very clever and practical.
Thanks so much for the tutorial! I’m happy that you made the mistake– now you and all of your readers don’t have to worry about mis-crossed cables again 🙂
What a great tutorial! I have to admit, I had the same thought as Tally–why not pull the stitches on the waste yarn through to the back before putting them on the DPNs? I’m about to start Rogue for myself, and I really hope I don’t need to refer to your fantastic tutorial, but it helps tremendously just knowing that it’s here! Thanks.
*de-lurks* Wow, that’s a wonderful tutorial! Congratulations on finding that trick! I’m really happy that you won’t have to rip back all of that wonderful sweater. Nice going.